When it comes to working with others, especially those not in an office adjacent yours, using Adobe Acrobat is a smart way to proof and edit projects collaboratively. Whether you have the free version (Acrobat Reader) or the paid Acrobat Pro, you’ll have access to all the tools needed to add your two cents to a project.
Not only does it provide a great paper trail, noting who made the comments and when, but it minimizes confusion stemming from messy penmanship. Need to rewrite an entire paragraph? Forget squeezing the rewrite into the margins or sending separate emails – you can add the text into a compact comment window without cluttering up the page.
Just to be clear, I’m not promoting Acrobat for the use of early writing drafts. Finalize the text in Microsoft Word or similar editing program. Acrobat shines in situations where text and images share the page; think drafts of annual reports, flyers, or brochures.
Acrobat is rich with features so rather than overwhelm you, I’m only focusing on the most useful comment and markup tools. These instructions are based on the latest version – Acrobat DC. Open up Acrobat or download the latest free version from Adobe’s site and let’s get started:
Find the tools
Open the PDF you want to review and select Comment from the menu on the right side of the window. The Comment tools should now be visible along the top (you’ll see speech bubble, highlighter icons etc.)
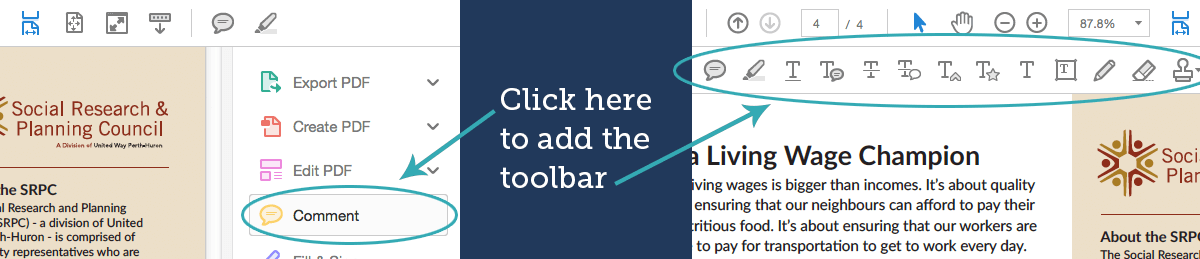
If you’re using an older version of the software, select the Comments drop down from the top of the screen. Select Show Comment & Markup Toolbar. The tools should appear below your main tools.


Marking up text
Proofing in Acrobat is much the same as marking up a printed copy in that you can add your comments and scratch things out, but you can’t actually retype the text. Well, in some cases you can but that’s a story for another day.
There’s a slew of options for commenting and markups. To start, you need to highlight the offending letter/word/sentence/section with your cursor then select one of the options from the toolbar.
You’ll be able to:
- Replace Text: highlight what you want replaced and type new text into the comment space provided.
- Insert Text: place a blinking cursor where you want the additional text to go and type it in.
- Cross Out: puts a line through any text you think should be deleted.
- Highlight: puts a swash of yellow over the text.
- Underline: I’m sure you can guess what this does.
Unsure about what some of the icons represent? Hover over them with your cursor and the tool names will appear.
If you make a mistake or change your mind about one of your edits, it’s easy to edit or delete:
Delete: Select the comment/edit and hit Delete on the keyboard or right click on the comment/edit and select delete from the drop down menu.
Revise an edit: Double click on it (or the symbol on the page representing it) and type in the new text.
Are you unable to select text with your cursor? If your PDF came from a designer, ask if they can resend a PDF that has live text. You’re unable to select text if it’s been converted to “outlines” (basically, it’s an image).
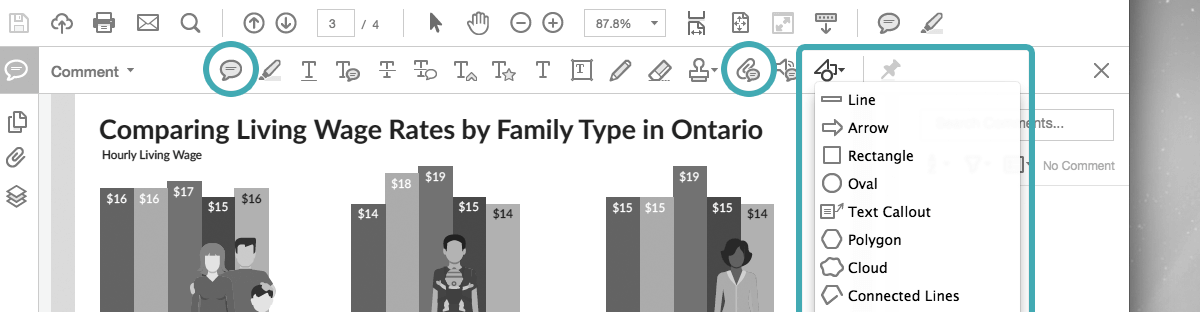
Comment on images and layout
The Tool: Sticky Note
Perfect for: Making overall comments about the document, an image or a section.
Where to find it: It’s the speech bubble icon. Select it, then click where you want it on the page (psst.. you can always move it later). A text box will appear for you to type in. When you’re finished, it will appear as a small speech bubble on the document until it’s clicked and the full text is displayed. A great space saver!
The Tool: File as Comment
Perfect for: Referencing images or data. e.g. “I think we should use an image more like this.” Then attach a photo.
Where to find it: It’s the icon with the speech bubble on top of the paperclip in the toolbar. For older versions: use the top drop down menus: Comment & Markup > Attach a File as Comment.
Hint: You may not want to go too overboard with attaching files as it will increase the overall file size.
The Tools: Freeform drawing or preset shapes
Perfect for: Highlighting sections of an image that you have specific feedback on. e.g. “Can you remove that piece of lint on the coat sleeve?”
Where to find it: The pencil icon is the free form drawing tool. It may be a bit tricky to wield with a mouse, but luckily there’s an eraser tool located beside it if your scrawls get a little out of control.
The preset shapes can be found under the triangle/square/circle icon. The drop down menu features the full shapes list.
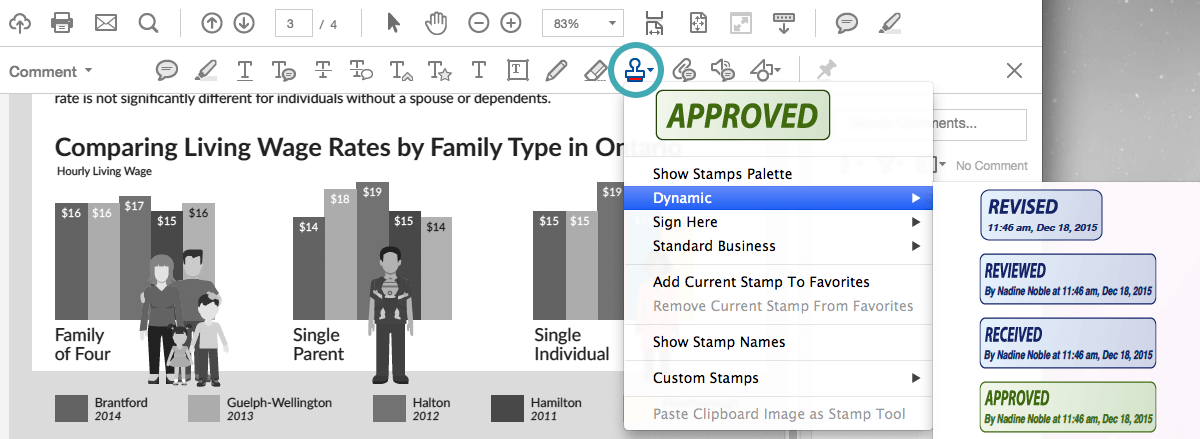
Put your stamp on it
There’s no arguing that digital stamps lack the fun of rubber stamps but they do have benefits of their own. The dynamic stamps in Acrobat make it easy to mark a document as Reviewed, Revised or Approved. Not only will it list your name (or the reviewer’s name), but also the time and date it was stamped.
Where to find them:
Select Dynamic from the stamp icon drop down list to choose your stamp type. Then just click on the document to place it. You can reposition or resize it to your heart’s content.
Review feedback and edits
I love this part. Acrobat provides a simple way to review all comments without having to click on each icon on every page.
Where to find it:
If you’ve been making comments, you’ve likely already noticed that it sits to the right of your window. If not, select Comment from that panel.
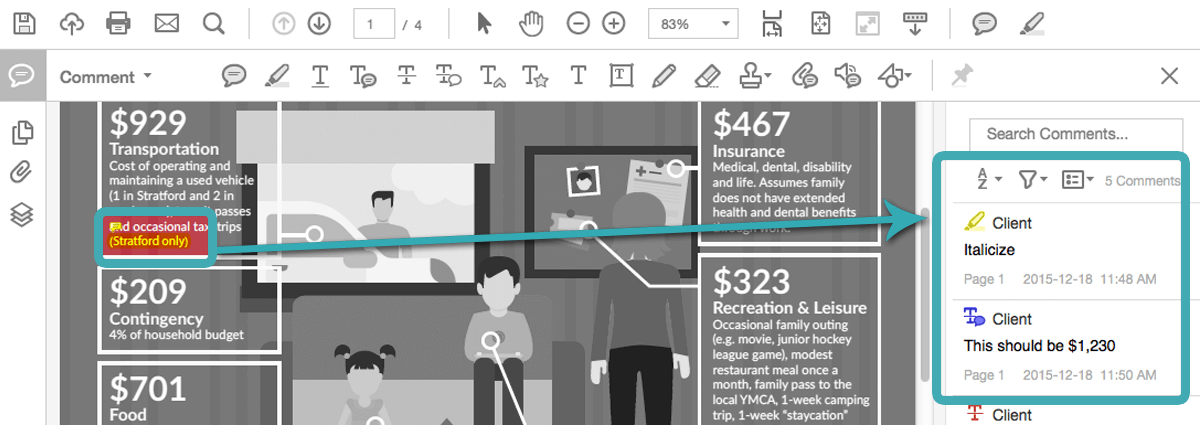
A complete list of every comment and edit in the document lives here. You can sort them by page, by author and numerous other handy categories. You can also make changes to the comments directly in this list – just double click. No need to go back through the document page by page.
If a question was raised or needs to be raised, you can click on another author’s comment and reply to it; a perfect way to collaborate.
Another useful feature is the checkbox beside each comment. (If you can’t see it, select a comment and it will appear). You can mark off what’s been completed or addressed and even view the comments by unchecked status so you can see what remains. It’s quite lovely, really.
Admittedly, I still occasionally review and markup hard copies, but it’s hard to deny the benefits of proofing digitally when working with a group or a remote partner. It’s just so darn efficient to have all the notes and feedback captured in one file that can easily be emailed from person to person. Not to mention it keeps things neat – no more guessing at what Joan scrawled across page 12. Best of all, these tools are available to us for free!
As with most software, remember to save your edits as you go along. Happy proofing!